How to create a Site Design (and apply theme) using a Site Script
Site design is currently being rolling out to targeted release which allows provision of modern team and communication sites based on certain branding/artifacts . For example, modern team sites must be created with a particular theme and a certain number of lists and libraries. Although, currently there are limited options for what you can do with this, but I believe it is certainly a great addition to SharePoint modern family.
What I will demonstrate in this blog is, how to create a site design with site theme using a site script and make it available to the users as a template which can be used for self servicing. Imagine, you have a corporate branding and the sites created must follow the branding and you would like that every site must contain a ‘Team meetings’ document library.
Firstly, let’s create a theme using Theme Generator. This is an excellent tool to create a branding for your organisation. The generator will provide an output in JSON, PowerShell and SASS.
Using PowerShell, let’s first ensure that all the existing themes are not available to the users. We can hide the existing themes using the following cmdlet. Note: you will need the latest version of SharePoint Online PowerShell.
Set-HideDefaultThemes -HideDefaultThemes $true
In order to create a theme, we will need the following PowerShell:
$themepallette = @{
"themePrimary" = "#424e78";
"themeLighterAlt" = "#f5f6f9";
"themeLighter" = "#eaecf3";
"themeLight" = "#d5d9e8";
"themeTertiary" = "#a7b0cf";
"themeSecondary" = "#4d5b8d";
"themeDarkAlt" = "#3b466c";
"themeDark" = "#2e3654";
"themeDarker" = "#242b42";
"neutralLighterAlt" = "#e7e7e7";
"neutralLighter" = "#e3e3e3";
"neutralLight" = "#dadada";
"neutralQuaternaryAlt" = "#cbcbcb";
"neutralQuaternary" = "#c2c2c2";
"neutralTertiaryAlt" = "#bababa";
"neutralTertiary" = "#595959";
"neutralSecondary" = "#2f2f2f";
"neutralPrimaryAlt" = "#252525";
"neutralPrimary" = "#000000";
"neutralDark" = "#151515";
"black" = "#0b0b0b";
"white" = "#eeeeee";
"primaryBackground" = "#eeeeee";
"primaryText" = "#000000";
"bodyBackground" = "#eeeeee";
"bodyText" = "#000000";
"disabledBackground" = "#e3e3e3";
"disabledText" = "#bababa";
 }
Add-SPOTheme -Name "SharePointer Branding" -Palette $themepallette -IsInverted $false
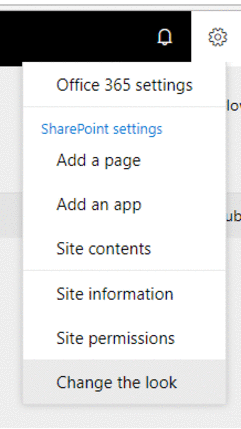
If this is created correctly, you should see the custom branding(s) only when you click Change the look under Settings.
Now let’s add this site theme to a template which will be automatically applied when a new site is created. In order to do this, we will need to create a Site Script in JSON. The JSON structure is fairly simple and contains ‘actions’, and ‘subactions’. Each actions/subactions is specified with a ‘verb’. Our script for applying the theme will be:
{
    "$schema": "schema.json",
    "actions": [
        {
            "verb": "applyTheme",
            "themeName": "SharePointer Branding"
        }
    ],
    "bindata": {},
    "version": 1
}
Let’s include, as per the initial requirements, a document library for ‘Team Meetings’ with a date column. Note the structure of actions, subactions and verbs used to create document library.
{
    "$schema": "schema.json",
    "actions": [
        {
            "verb": "createSPList",
            "listName": "Team Meeting Documents",
            "templateType": 101,
            "subactions": [
                {
                    "verb": "SetDescription",
                    "description": "Meeting Documents"
                },
                {
                    "verb": "addSPField",
                    "fieldType": "DateTime",
                    "displayName": "Meeting Date",
                    "isRequired": true,
                    "addToDefaultView": true
                }
            ]
        },
        {
            "verb": "addNavLink",
            "url": "/Team Meeting Documents",
            "displayName": "Team Meetings",
            "isWebRelative": true
        },
        {
            "verb": "applyTheme",
            "themeName": "SharePointer Branding"
        }
    ],
    "bindata": {},
    "version": 1
}
Currently, only limited number of verbs are available, but I am sure more verbs will added to the scheme.
createSPList
setTitle
setDescription
addSPField
deleteSPField
addContentType
removeContentType
setSPFieldCustomFormatter
addNavLink
applyTheme
setSiteLogo // Only available for communication site
joinHubSite  // Not available since Hub Site is under development
triggerFlow
You can also use PnP provisioning engine template, if you find this limited.
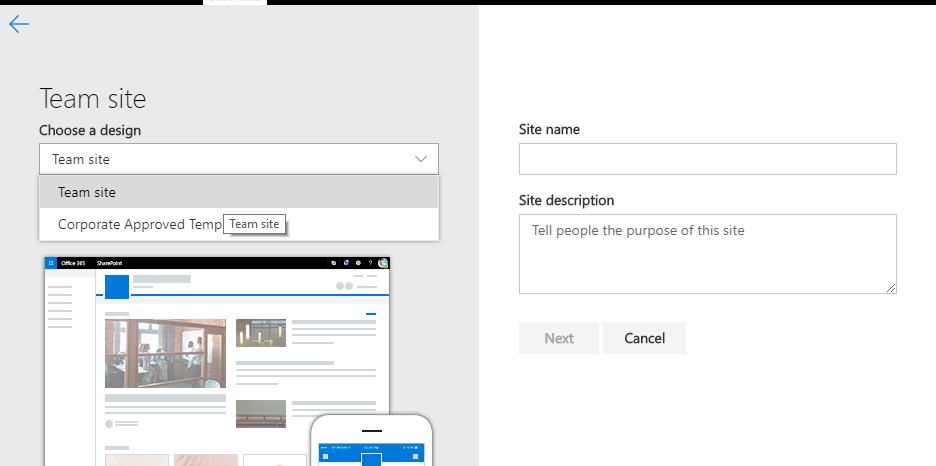
Let’s now create a site design with this script using PowerShell. There are three cmdlets used 1) get the content from the JSON script file 2) add the script using ‘Add-SPOSiteScript’ cmdlet and 3) to add a site design using ‘Add-SPOSiteDesign’:
$script = Get-Content 'customlistscript.json' -Raw | Add-SPOSiteScript -Title "Corporate Approved Site Template" -Description "Corporate Site Template"
Add-SPOSiteDesign -Title "Corporate Approved Template" -WebTemplate "64" -SiteScripts $script.Id -Description "Corporate Approved Template"
And if everything is applied correctly, we will see a dropdown list, when we create a new SharePoint site:
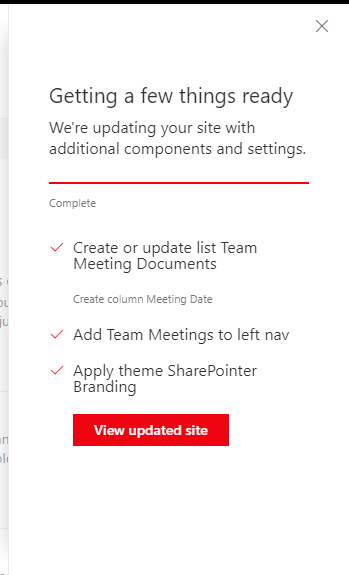
After the site has been created and when the user will click the ‘Finish’ button the site will be updated based on our script.
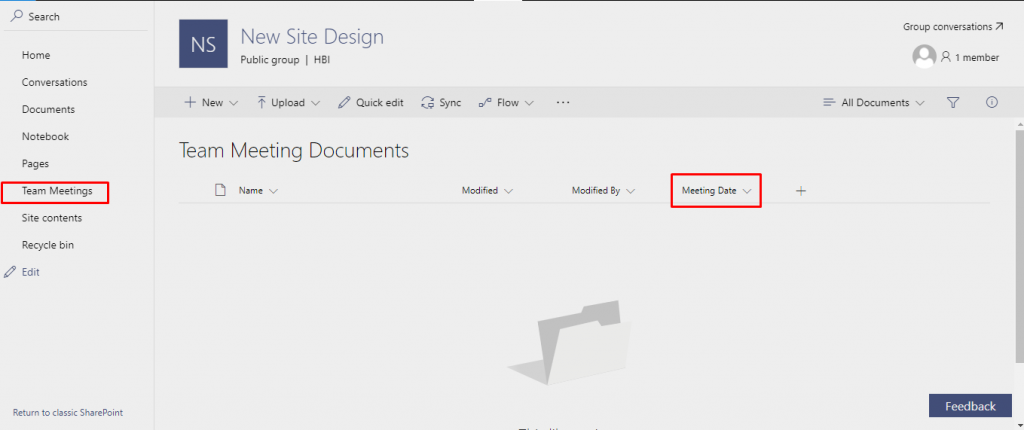
Here is our new site created with SharePointer branding and a ‘Team Meetings’ document library.
Happy SharePointing!
1 Comment
Mihir · June 7, 2018 at 11:49
Above example is cool.
Can you show me an example of adding a lookup column? I have tried but failed to complete. My schema looks as below.
{
“verb”:”addSPFieldXml”,
“schemaXml”:””
}